Registering and Boarding Devices to VHQ
- Registering and Boarding Devices to VHQ
- Registering Devices to VHQ
- Boarding the Devices to VHQ
- Auto-boarding
- Adding Devices Manually
- Adding Devices via File Import
- Adding Devices using .CSV file
- Timed Import Service
- Device Import Result .CSV file
- Adding Devices using .XML file
- Device Import Result XML File
- All Pages
Learn how to board the devices and register on VHQ.
The device establishment, or “registration”, is the first step to establish the device information in the VHQ Server. Once the devices are boarded in the VHQ, you can manage devices, view the device information on the Device Profile screen in the VHQ, and you can edit the device information, delete a device, blacklist the device, and also swap the devices.
Once the devices are boarded in the VHQ, you can organize the devices under the required hierarchy. Hierarchies are the basis of device organization. VHQ hierarchies allow a high degree of flexibility and granularity in organizing devices with up to lower levels of specificity. For example, hierarchies can be established based on the Company, Region, State, City, Store, Lane, etc. These hierarchies' assignments can also be specified while boarding the devices
For more information on:
- Hierarchies and groups - Refer to the Organizing section.
- Device Status like: Active, Pending Hierarchy, Inactive, Deleted, Blacklisted and Pending Registration - Refer to the Device Life Cycle section.
- Device Information like: Application information, Operating System information, Key information, Event notifications, Download packages etc. - Refer to the Device Information section.
- Device Configuration like changing the status of the device, Modifying the Serial number and Device ID, etc. - Refer to the Device Configuration section.
Registering Devices to VHQ
The following steps have to be performed to register a device in VHQ:
- Boarding Device Details: Provide the device details, which include Device Model Number (like MX925), Device Serial Number and the location in the VHQ hierarchy where this device should be located. This can be done from the VHQ GUI from the "Add Devices" screen. It is also possible for the VHQ Server to automatically get this information when the VHQ Agent in a device communicates for the first time with the VHQ Server, and based on the device IP address the server can automatically place a device in a specific location in the VHQ hierarchy. Once this step is completed, the device will be in "Pending Registration" state.
- Successful Key Exchange: The VHQ Agent in a device performs the "key exchange" operation during its first communication session with the VHQ Server. Once this operation is successfully completed, the device will be in "Active" state. However, if a device is automatically boarded in VHQ and if the VHQ Server is unable to determine the exact location where the device can be placed in the VHQ hierarchy, then the VHQ Server sets the status of the device to "Pending Hierarchy Assignment" and assigns it to the root node of the hierarchy. In this case, a VHQ user has to manually assign the hierarchy for the device from the VHQ GUI, then the device status will automatically change from "Pending Hierarchy Assignment" to “Active”.
Device Heartbeats
The device performs generic heartbeats in which the Terminal Agent accesses the VHQ Server to ask for updates and exchange of information. The VHQ Server qualifies the heartbeat to be one of three types based on specific conditions and sends the appropriate Management Plan. A Management Plan is a task list of user configurable actions for the device to perform. This task list can include a request for diagnostic data, logs or event details to be uploaded to the VHQ Server, files to be downloaded from the server, or actions (reboot, delete files, and the like) to be performed on the device.
Heartbeat Types
- Registration: If the first contact is from the device to the VHQ Server, it will be treated as a Registration heartbeat.
- Alive: Any heartbeat occurring outside the device maintenance window is considered an “I’m alive” heartbeat and logged as such in the VHQ Server.
- Maintenance: A heartbeat that falls within the device maintenance window is treated as a Maintenance heartbeat. The VHQ Server responds by evaluating if software or content updates are available and sends a Management Plan to the device accordingly.
The “HeartbeatFreq” parameter is used to specify the frequency (value in seconds) at which the VHQ Agent should send a heartbeat message to the VHQ Server. For example, if the VHQ Agent should send a heartbeat message, once every hour (3600 seconds), then the parameter “HeartbeatFreq“ should be set to a value of 3600. The minimum recommended value for the “HeartbeatFreq” parameter is 900 seconds, which is 15 minutes. If the value of the “HeartbeatFreq” parameter is not explicitly specified, then the VHQ Agent will use the default value of 3600 seconds (60 minutes). If the requirement is to have the VHQ Agent communicate with the VHQ Server, at least once a day, then you need to ensure that the value of the “HeartbeatFreq” parameter is NOT set to a value greater than 86400 seconds, which is 24 hours.
Since the communication sessions between the VHQ Agent in a device and the VHQ Server are initiated by the VHQ Agent at the frequency specified for sending the heartbeat messages, you need to select a value for the “HeartbeatFreq” parameter that will ensure that the VHQ Agent is communicating as often as you need it to communicate with the VHQ Server, so that it can quickly be notified by the VHQ Server about any actions that the server wants the VHQ Agent to perform in the given devices.
Boarding the Devices to VHQ
The devices can be boarded using the below mentioned modes:
1. Auto-boarding-Device registers to VHQ and get auto-configured.
2. Adding Devices Manually - Entering the device details manually through VHQ UI.
3.File Import - Configuring large set of devices using batch upload.
- Uploading a CSV file.
- Uploading an XML file
4. Rest() API - The application can use this API to batch upload devices.
5 Web service - The .CSV or XML file can be dumped in the backend.
Auto-boarding
The device establishment, or “registration”, is the first step to establish the device’s information in VHQ. When the device communicates to the VHQ Server for the first time, the registration is performed through key exchange. In Auto-Registration process, the device information like: device’s serial number, customer ID, model and IP address are also sent to the server during the key exchange.
The high level steps that have to be followed to register devices in VHQ using the auto-registration method are given below:
- Define the IP address range in VHQ hierarchy for the devices.
- Ensure that the device information is NOT pre-boarded from the VHQ GUI.
- Load the VHQ Agent in the required devices along with the required configuration package for the VHQ Agent.
- When VHQ Agent in a device communicates for the first time with VHQ Server, it performs a key exchange operation with the VHQ Server and then it tries to determine the location in the VHQ hierarchy where this device has to be placed, based on the IP address reported by this device.
- If VHQ Server is able to determine the exact location in the hierarchy where this device has to be placed, then it sets the device status to “Active”. If this is not the case, then the VHQ Server sets the status of this device to "Pending Hierarchy Assignment" and assigns it to the root node of the hierarchy. Once a VHQ user sets the hierarchical value for this device from the VHQ GUI, then the status of this device will automatically change to “Active”.
Adding Manually
You can also enter the device information manually.
To add devices manually:
- Go to Device Management > Manage Devices > Add Devices. The Add Devices screen is displayed.
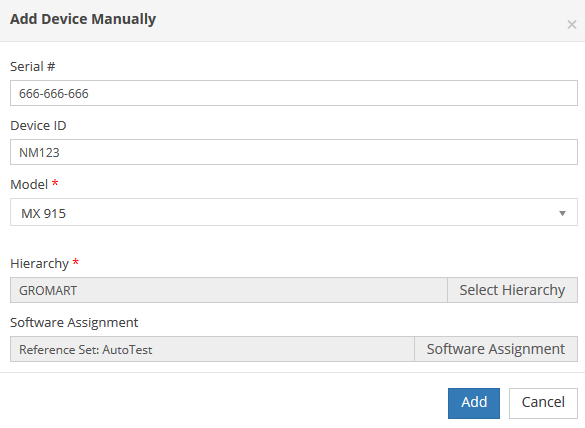
- Click Add Device Manually. The Add Device Manually screen is displayed.
- Enter the Serial # and Device ID in the respective boxes.
- Select the device model in the Model drop-down list.
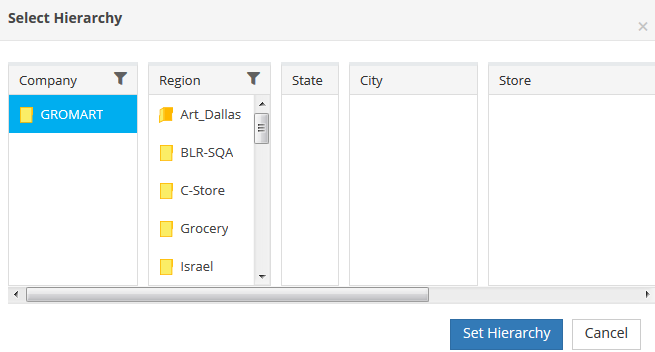
- Click Select Hierarchy. The Select Hierarchy screen is displayed.
- Select the hierarchical level and then click Select Hierarchy or click Cancel to close the Select Hierarchy screen.
- Click Software Assignment. The Software Assignment screen is displayed.
a. Click Enabled to enable the download automation or click Disabled to disable the download automation.
b. Select the Assignment Type check box and then click the software assignment option such as Reference Set or Packages.
- When you click Reference Set, you can either assign the software, directly or inherit from the hierarchy.
- When you click Packages, the Available Packages are displayed to assign the packages for software assignment.
c. Click Add to assign the software or click Cancel to close the Software Assignment screen. - Click Add to add the device details or click Cancel to close the Add Device Manually screen. The confirmation message, “Device added successfully” is displayed. Click OK to close the message box.
NOTE: The Device ID must be unique within the given model. User must either enter the Serial# or the Device ID to add the device details.
Adding Devices via File Import
You can board device information for a single device or multiple devices using File Import. These device information can be imported to VHQ using the files in .CSV or XML format. You can also modify or delete devices through the File import.
To add devices via file import:
- Go to Device Management > Manage Devices > Add Devices. The Add Devices screen is displayed.
- Click Add Device via File Import. The Add Device via File Import screen is displayed.
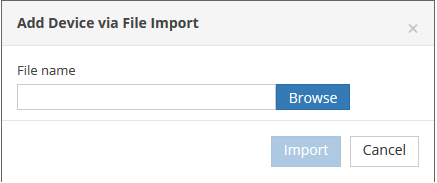
- Click Browse for the file and the click Import.
- You can view the device import results in Device Management > Import/Export > Import.
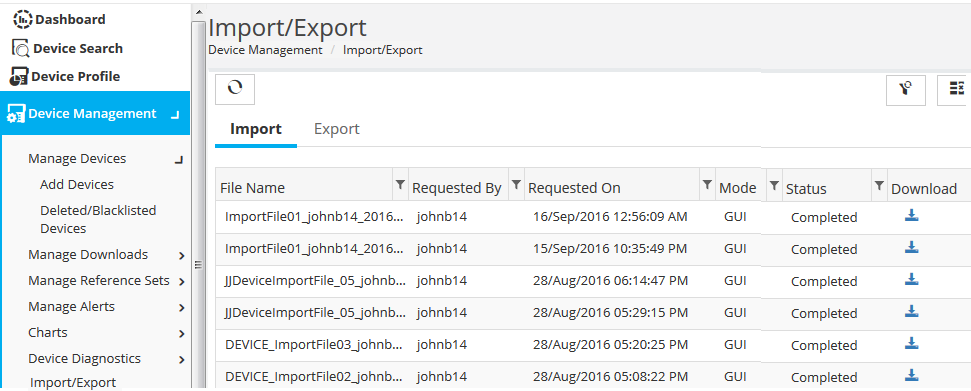
5. Click ![]() (Refresh Data) to refresh the device import list.
(Refresh Data) to refresh the device import list.
6. Click  (Reset) to reset the changes on the Import/ Export screen.
7. Click (Show/Hide Columns) to show or hide columns in the Import/Export screen. The Show/Hide Columns dialog box is displayed.
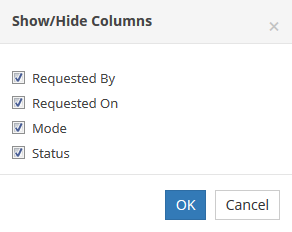
- Select the required checkbox to show on the Import/Export screen.
- Click OK to save the changes or click Cancel to close the dialog box.
8. Click  (Download) to download the device import results file.
Adding Devices using .CSV file
You can add, modify or delete information for one or more devices using .csv file.
NOTE: The Device model naming convention must be as per the Verifone Style guideline.
The .csv file has the following columns:
| Column Name | Description |
|
Version |
Indicates the .csv file version. |
|
ADD/ADD_MODIFY/MODIFY/DELETE |
Indicates the device operations. The operation is mandatory and must be entered. |
|
282-878-111 |
Indicates the device serial number. The device serial number is mandatory and must be entered. |
|
wegmans >> IMPORT |
Indicates the device hierarchy. |
|
VX 820 |
Indicates the device model. |
|
Import |
Indicates the device group. |
|
DID282 |
Indicates the device ID. |
A new attribute “Protocol” is added in Device Import XML. If the protocol is not specified in the XML, then the following default criteria are considered.
| Model Type | Default Protocol | Valid Values |
|
Vx eVo |
VHQ |
VHQ |
|
V/OS |
VHQ |
VHQ only |
Timed Import Service
The import service feature automatically picks the input file available in .csv or xml format from the Timed Import Input Repository folder at the specified pole timer and processes the file. The processed file is then stored in Timed Import Output Repository folder. This output file with the result file of the import can be viewed by the user from the UI as shown in the below screen.
- Go to Device Management > Import/Export.
- In the Imports tab click the small black arrow in the Mode column.
- Select Timed Import from the drop-down and click go. The Timed Import files are displayed.
- Click (Download) to download the file.
NOTE: The configuration for the Timed input /output repository folder is done at the backend by the system user.
Device Import Result .CSV file
The device import result file returns the results or the status of the imported files on the device. The csv format includes:
|
Row 3 |
Indicates the row. |
|
282-878-111 |
Indicates the device serial number. |
|
VX820 |
Indicates the device model. |
|
ADD_MODIFY |
Indicates the device operation. |
|
Status |
Indicates the device operation status. |
Adding Devices using .XML file
You can add, modify or delete device information for one or more devices by using .xml file.
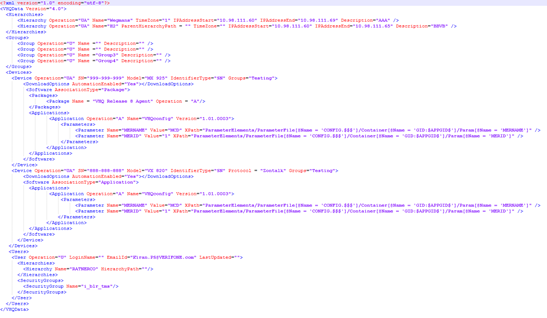
The .xml file format includes:
|
Version |
Indicates the device version. |
|
Hierarchy |
Indicates the hierarchy to which the device is assigned. |
|
Operation |
Indicates the operations performed. The operations performed are listed: · A-Adding the hierarchy. · D-Deleting the hierarchy. · U-Updating the hierarchy. · UA-Updating and Adding the hierarchy. |
|
Name |
Indicates the hierarchy name. |
|
TimeZone |
Indicates the hierarchy time zone. |
|
IPAddressStart |
Indicates the hierarchy, starting IP address. |
|
IPAddressEnd |
Indicates the hierarchy, ending IP address. |
|
Description |
Indicates the hierarchical description. |
|
Hierarchy Path |
Indicates the hierarchy path. |
|
ParentHierarchyPath |
Indicates the parent hierarchy path. |
|
Group |
Indicates the group to which the device is assigned. |
|
Operation |
Indicates the operations performed. The operations performed are listed: · A-Adding the group. · D-Deleting the group. · U-Updating the group. · UA-Updating and Adding the group. |
|
Name |
Indicates the group name. |
|
Description |
Indicates the group description. |
|
Device |
Indicates the device. |
|
Operation |
Indicates the device operations. The operations performed are listed: · U-Updating the device. · A-Adding the device. · UA-Updating and Adding the device. · D-Deleting the group. · DA-Deleting and Adding the device. |
|
SN |
Indicates the device serial number. |
|
Model |
Indicates the device model. |
|
Identifier Type |
Indicates the device identifier type. |
|
Protocol |
Indicates the device VHQ protocol. |
|
Groups |
Indicates the device groups. |
|
Download Options |
Indicates the device download options. |
|
Automation Enabled |
Indicates if the automation download is enabled for the device. |
|
Software |
Indicates the device software. |
|
AssociationType |
Indicates the device software association type. The association type can be a Package or Reference Set. |
|
Package |
Indicates the package. |
|
Name |
Indicates the package name. |
|
Operation |
Indicates the package operations. The operations performed are listed: · U-Updating the package. · A-Adding the package. · D-Deleting the package. |
|
Application |
Indicates the application. |
|
Operation |
Indicates the application operations. The operations performed are listed: · U-Updating the application. · A-Adding the application. · D-Deleting the application. |
|
Name |
Indicates the application name. |
|
Version |
Indicates the application version. The Version attribute on an Application element is set to a special, recognized string with the value "Current" (case-insensitive). When the Version attribute is set to Current then any Parameters provided in the Parameter element associated with the relevant Application are assigned to the version of software, which is presently assigned to the Device. For more information, refer How does the Version attribute in Import Device XML file works? |
|
Parameter |
Indicates the parameter. |
|
Name |
Indicates the parameter name. |
|
Value |
Indicates the parameter value. |
|
XPath |
Indicates the parameter path. |
|
User |
Indicates the user. |
|
Operation |
Indicates the user operations. The operation performed is listed. · A-Adding the user. |
|
Login Name |
Indicates the user login name. |
|
Email ID |
Indicates the user email id. |
|
Last Updated |
Indicates the last update done. |
|
Security Group |
Indicate the security group. |
|
Name |
Indicate the security group name. |
NOTES:
The size of the file can be up to 50 MB.
For 100,000 Devices, maximum of 3000 parameters is supported.
Device Initiate Downloads are considered presently.
Device Import Result XML File
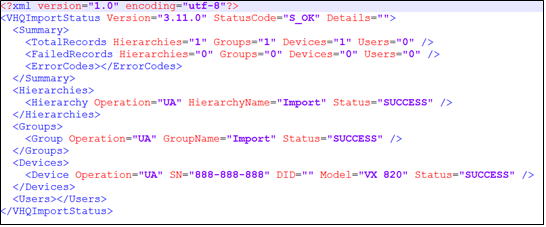
You can view the device import results by downloading the results .xml file from Device Management > Import/Export.
