Managing Users
Learn how to add a user, edit user, activate/deactivate user, and assign rights to the user.
You can configure to authenticate the requester login with VHQ. On configuring VHQ authentication, you can securely manage user accounts and groups, and limit the ability to perform certain actions by assigning rights and permissions to them.
Adding User
You can create users and assign rights.
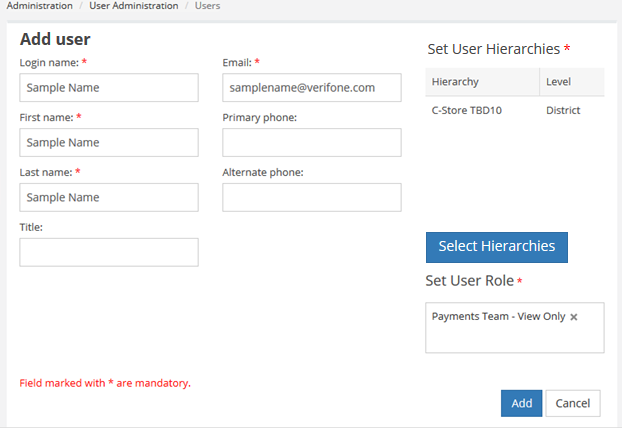
To add a user:
- Go to Administration > User Administration > Users.
- Click
 to add a user.
 - Enter the requested data in the appropriate fields. You must enter all the data in the mandatory fields.
- Click Add.
NOTE:
The e-mail mentioned is a sample e-mail.
NOTE:
By default, the user is activated.
Setting User Hierarchy (Required)
You must set user hierarchy. A user hierarchy represents level and value.
To set hierarchy:
Click Select Hierarchy in Add user screen. The values are added to the field.
Setting User Role (Required)
You can assign roles to the users. Users who are placed in the roles will inherit the permission. The users can perform tasks depending on the privileges granted by their roles.
To set user role:
- Click on Select Roles of the Set User Role field in Add user screen. You can select multiple user role from the drop-down.
- Click Add.
The user is added to the list in Users screen.
If a user wants to get e-mail notifications for one or more types of alerts, then the alert notification must be enabled for these alerts as part of the user's profile. The system generates the temporary password for the user. The user must reset the password in 24 hours; failure to do so, will lock the account. For more information, contact VHQ support team.
Login Failure and Account Lockout
For any invalid user name or password entry, the account locks after five successive failed log in attempts.
Unlocking Accounts: An Administrator can reset a password. If an e-mail account is specified for the user profile, a temporary password will be sent via e-mail to the user’s stored e-mail address. If e-mail access does not exist, a temporary password will be displayed to the Administrator.
Password Complexity: Valid inputs for a password are the following:
- Numeric characters - 0 to 9
- Alpha characters - lower and upper case
- Special characters - ~!@#$%^&*()_+`-=|[]\\:\";'<>?,./
Passwords must contain the following:
- At least one numeric character.
- At least one uppercase alphabetic character.
- At least one of the special characters listed above.
- The specified password must be at least 8 characters in length.
NOTE:1. If a VHQ user has an e-mail address specified, VHQ will send the newly-generated temporary password to the user's e-mail address. If not, the newly-generated temporary password will be displayed on the screen for the administrator to communicate to the user.
2. If a user has two login accounts, and if Active Directory based authentication is enabled in VHQ, then if the user tries to login to VHQ as non - Active Directory user, the server will not allow this user to login as non-Active Directory user account will be made inactive.
Editing User
You can edit a user.
To edit a user:
- Go to Administration > User Administration > Users.
- Select a user and click
 to edit a user.
- You can edit the values in the field and also set user alerts. However, you can change the role assigned to the user in the edit screen.
- Click Reset Password button to reset the password. This button is present when one of the users in the user list is selected for editing by double clicking that user name. A user with the required User Admin right can reset the password for any user. If an e-mail address is present in this user's profile a new temporary password is sent via e-mail to this user; else the temporary password is displayed on the screen, for the administrator to communicate to the user.
- Click Activate to apply the changes.
Activating User
The user with an Inactive status can be activated.
To activate a user:
- Go to Administration > User Administration > Users.

- Select a user with and click .
- On the edit screen, click Activate.
Deactivating User
You cannot delete a user, but you can deactivate an account so a user can no longer log in to the application. Consider the following while deactivating users:
- Deactivated users lose access to any records that were manually shared with them, or records that were shared with them as group members. However, you can still transfer their data to other users, and view their names on the Users page.
- Deactivated users are removed from the default account and group of other users. The deactivated users' default account and group are not removed.
- If a user in a group has Read/Write access and is deactivated, then the access will default to Read Only if the user is reactivated.
- You can't deactivate a user selected in a custom hierarchy field.
- When a delegated external user administrator deactivates a portal user, the administrator doesn't have the option to remove the portal user from any teams that user is a member of.
- Subscription information cannot be restored if you deactivate multiple users that are following each other. For example, user A follows user B and user B follows user A. If you deactivate user A and user B, their subscription information to each other is deleted from Following and Followers lists, and can’t be restored if you reactivate the users.
- It's possible for inactive users to be listed as Created By users even though they are no longer active in an organization.
- You can’t deactivate a user if they’re assigned as the sole recipient of a workflow e-mail alert.
To deactivate a user:
- Go to Administration > User Administration > Users.
- Select a user and click
 to deactivate user.
Assigning Roles
This feature allows you to manage roles and change the privileges of the user under a particular role. You must create a role to assign to the user.
To add roles:
- Go to Administration > User Administration > Roles.
- Click to add a role. Enter the role name and description.
- Click Add. The role has been created with the description listed under Roles screen.
Editing Role
You can also edit a role.
NOTE:
Multiple roles cannot be edited at the same time.
To edit a role:
- Go to Administration > User Administration > Roles.
- Select a role and click to edit role.
You can edit the role name and description. However, you must define the rights and assign the rights to the user.
The Edit Role screen includes:
- Rights
- Users
Deleting Role
You can delete multiple roles from the role screen.
To delete role (s):
- Go to Administration > User Administration > Roles.
- You can select the multiple roles and click
 .
.
Assigning Rights
Administrators can assign specific rights to group accounts or to an individual user. These rights authorize users to perform specific actions, such as logging on to a system interactively or backing up files and directories. User rights are different from permissions because user rights apply to user accounts, and permissions are attached to objects.
Adding Rights
You can add rights to the role.
To add rights to the role:
- Click to add rights to the role in the Edit Role screen.
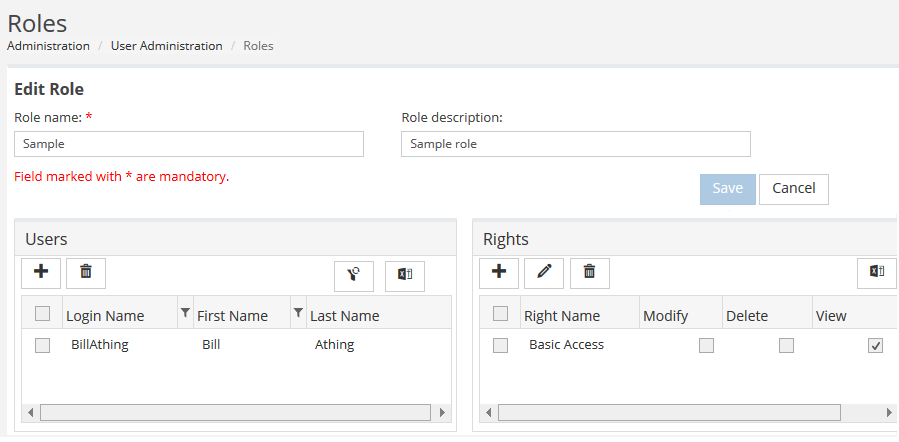
- Click Save. The rights are added to the list.
Editing Rights
You can edit rights.
To edit rights:
- Select the rights or multiple rights from the list in the Edit Role screen.
- Click .
You can edit rights by selecting the check boxes corresponding to column Right Name and click Save.
Deleting Rights
You can also delete multiple rights.
To delete rights:
- Select multiple rights from the list in the Edit Role screen.
- Click.